Microsoft Word has a lot of purposes and it is not just a word processing application. You can format your text in different ways and make professional business documents. With so many usages and features, you may not know how to apply every one of them. Here we will show you how to insert checkbox in Word next time you need to make a to-do list, a survey or a checkbox is a part of your business documents.
There are two kinds of checkboxes in Word and depending on what you need to do with your document and what is your Word version, choose the appropriate guide.
Insert checkbox in Word 2016 for printed documents
This guide is applicable for Word 2010 and versions after that.
If you want to use the paper version of your document and to tick the boxes with a pen, you simply need to insert checkbox characters.
Clik here to view.
- Write text for your list and select it by holding the left mouse button and dragging it from the first to the last point in the list.
- Make sure the Home menu is opened. Find Paragraph tab there.
- Next to the bullet points icon you will see an arrow that symbolizes the drop-down menu. Open the drop-down menu and click on Define New Bullet.
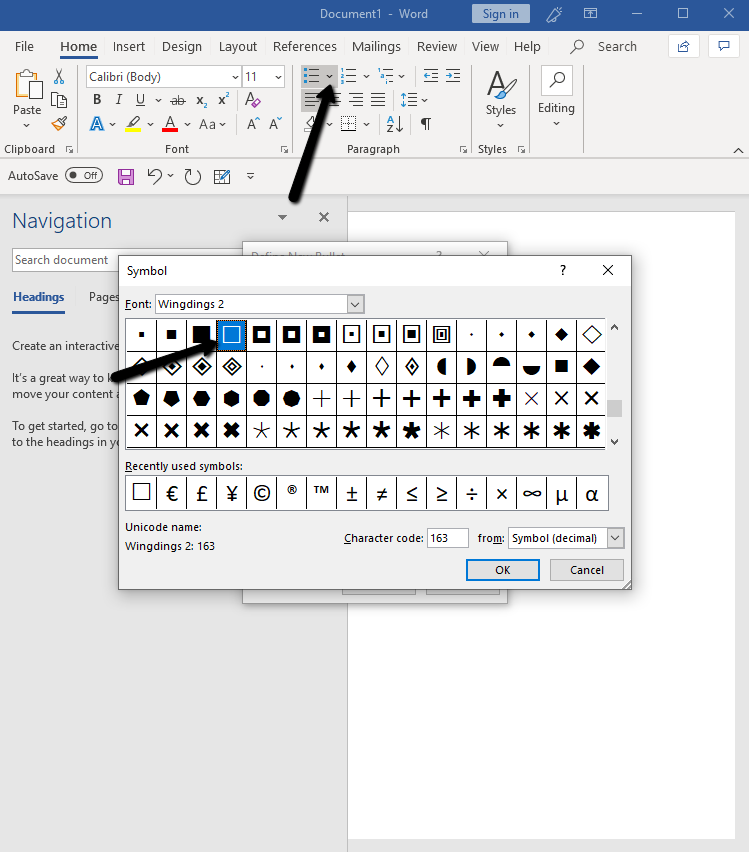
- Click on the Symbol tab.
- From the list of fonts, select Wingdings (or Wingdings 2 in newer versions of Word) and find the appropriate, empty checkbox.
- Click OK to confirm and then once more.
Insert checkbox in Word 2007 or older
If you still use older versions of Word, the steps for inserting checkboxes are slightly different.
- Select the list and right click on the mouse.
- Click on the Bullets and Numberings on the shown menu.
- Select any bullet style and then click on Customize.
- Click on Character.
- From the selection of fonts, choose Wingdings.
- Find the checkbox and click OK.
This option will replace default bullet points with an empty checkbox. You won’t be able to fill in the form, but it is useful when you want to print out your document.
How do you add a fillable checkbox in Word
If you need interactive Word document where you can tick the checkboxes, here’s what you need to do:
- Go to the File menu and click on Options to open the additional window called Word Options.
- Click on the Customize Ribbon.
- In the right drop-down menu check if the “Customize the Ribbon” is selected.
- Find the Developer checkbox and click on the + button.
- Tick the Developer checkbox and click another plus button next to the Controls checkbox.
- Click on Checkbox Content Control and finally click OK.
- The Developer menu will be visible in the main toolbar.
- Find the Controls tab in the Developer menu and click on the checkbox icon.
Depending on how many checkboxes you need, click on that checkbox icon to create interactive and fillable checkboxes. By default the X sign will appear when you check the box. If you want to change that symbol and put let’s say the Image may be NSFW.
Clik here to view. sign, go to the Properties option in the Controls tab.
If the Properties icon happen to be blurred, you need to check the box you inserted and then go there. At the bottom of the Content Control Properties you will see Check symbol option. Click on the Change button and choose the preferred sign for the checkbox. Click OK to confirm the changes.
Clik here to view.

Insert a single checkbox in Word
Checkboxes are mainly used to create to-do lists, surveys, and other types of lists. But sometimes you may need only one checkbox that will be placed somewhere in the text. To insert only one checkbox, follow these steps below.
- Click on the exact place in the document where you want to insert a single checkbox.
- Click on the Insert menu and then on Symbol option.
- From the list of symbols find the checkbox symbol you want to insert and double click on it.
Enlarge the size of a text box without enlarging the text
If you want to change the size of the checkbox, click on it with the left mouse button and the small squares will show up enabling you to drag the box and making it bigger. It may happen that the text increases in size together with the box but you can easily change the font size. Just select the text and in the Font options change the size.
The post How to insert checkbox in Word appeared first on PCE Blog.