Since paper documents are widely replaced by digital documents, it is no wonder that business users turn over to digital signatures instead of traditional ones. Given that most types of business documents that require a signature are actually done in Word, here we will show you how to sign a Word document. Of course, when you finish your document you can always convert Word to PDF and even secure a document with a password.
There are different ways to sign a Word document:
- Create a signature line, print a document and sign it with a pen
- Digitally sign a Word document
- Insert handwritten signature into your Word document
- Add a signature plus company info
Insert a digital signature in Word
This guide is available for Office 365, 2010 and all newer versions.

- In the Insert menu, find Text tab.
- Click on the drop-down menu next to Signature Line.
- Then click on the option Microsoft Office Signature Line.
- In the field Suggested Signer type your full name.
- Fill in other details that you want to include such as your email address and title.
- Check the box that will allow you to add comments in the Sign dialog.
- If you don’t want the date to appear in the signature, uncheck the box that is checked by default (Show sign date in signature line).
- Confirm the signature settings by clicking OK.

Insert a handwritten signature
It is not possible to digitally sign a Word document with a handwritten signature. But, if you still want to have a handwritten signature in your Word document, there is a way to make this possible.
First of all, you need a picture of your handwritten signature. So you can either use a scanner or a phone camera to take a photo of your handwritten signature. Next, you just need to insert that photo into your Word document.
- Select the place in the document where you want to add a signature.
- In the Insert menu, click on the Pictures.
- Locate the photo of your signature and click on the Insert button.
- Once you insert the image, you will see the Crop button available in the top right corner of the Word toolbar. If you don’t see it, click on Picture Tools (somewhere it’s called Picture Format).
- Crop the image by dragging its edges from one side to another and making the photo smaller.
If you find cropping images in Word difficult, you can crop the image in Paint or any other image editor and then insert it into Word.
You can use Enter and Space keys on the keyboard to move the photo and change its position.
Include company info with your signature
In addition to your handwritten signature that you have just added to your Word document, you can add some company info and give your signature even a more professional look.
So after you follow the steps above to insert a handwritten signature, continue by following the steps below:
- Under the inserted handwritten signature, type the information you want to include in it (like company info, address, number).
- Select the image of your signature and that additional information by holding the left mouse button and dragging it from one side to another.
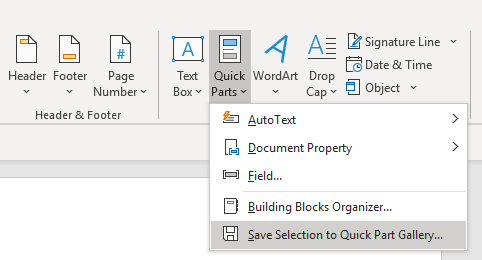
- Click on the Insert menu and find the Quick Parts button in the Text tab.
- From the Quick Parts options click on Save Selection to Quick Part Gallery.
5. In the Name field, type the name of your signature block, so next time you need you will search it by that name.
6. From the Gallery drop-down list, select AutoText.
7. Click OK to confirm the changes.
8. To add this type of signature in Word, go to Quick Parts > AutoText and choose the name of your signature block.

How to add a signature line in Word
If you prefer old-fashioned way of signing documents with a pen, you can just insert a signature line in Word. Once you print the document you will be able to write a signature on the line.
- Click on the exact area in the document where you want to add a signature line.
- Go to the Insert menu and click on Signature Line.
- When the pop up dialog opens, don’t type in the fields if you want to have an empty signature line. Just click OK and the signature line will appear.
Another even easier way to add signature line is to enter the underscore line ______ (also called underline) multiple times, to make it long enough to write your signature on a printed document.
The post How to sign a Word document appeared first on PCE Blog.